
AI-powered image and video generation has gotten to a point where the quality of output is less a matter of the raw model’s capabilities and more about the direction. A lot of people still use programs such as Grok Imagine casually, typing random, descriptive prompts and expecting something remarkable. The result is usually uncoordinated framing, confused design, or graphics that seem like they’re generic.
The distinction between poor output and high-quality visuals lies in the direction you take with the model. Making Grok Imagine like a passive generator results in background noise. The idea of treating it as the camera on a set can result in precise, deliberate outcomes.
This article will help you control Grok Imagine as professionals. It provides the most critical components, such as shot control, art style, frame control, grounding, physical and logical detail, so that you can consistently create high-quality images, instead of leaving results to chance.
Why Most Grok Imagine Outputs Look Average?
If the prompts are unclear, the model fills in the gaps by making assumptions. This isn’t a random occurrence; however, it’s not always in line with the intention you’re trying to achieve. Common issues include:
- Unclear camera perspective
- Characters drifting away from the frame
- Inconsistent lighting or mood
- Overcrowded scenes that clash with details
These problems arise because the model doesn’t have an obvious visual hierarchy. In the absence of guidance, Grok Imagine behaves like an unsupervised photographer who wanders around the scene rather than an organised camera operator who follows directions.
Step 1: Boss the Camera First With Shot Type
Every professional photo starts with a clearly defined camera decision. Before you mention specific locations, characters or even mood, it is essential to indicate the kind of shot.
Shot control examples are:
- Wide shot, medium shot, close-up
- Shot of the shoulder
- Low-angle or high-angle shot
- Frame static and slow push-in
By stating the type of shot earlier, you can immediately limit the composition. This stops accidental cropping, incongruous zoom levels or even subject confusion. The direction of the shot tells Grok to imagine where the camera is before anything else within the scene.
Pro tip: Put the shot type at the starting point of your prompt. The first instructions have more structure than descriptive embellishments.
Step 2: Lock the Vibe With Art Style Before Characters Drift
Art style isn’t decorative; it’s a management system. With no style in place, Grok Imagine blends influences with a variety of visuals, which often appear unclear or unfocused.
Clear style direction can include:
- Cinematic realism
- Illustration inspired by animation
- Photorealistic documentary
- Painterly, oil-on-canvas look
- Retro-futuristic or cyberpunk aesthetics
Predicting the art style in advance stops characters, as well as lighting and textures, from wandering off into different visual interpretations. The model is aligned with all elements, including faces, environment and colours, to the stylistic anchor.
The key point is that art style should be a priority over the description of the character. Style dictates how characters are depicted and not the reverse.
Step 3: Force the Frame With Physical Anchors
Professional visuals are grounded since they are in tune with the boundaries of space. One of the most efficient methods to control AI-generated images involves introducing physical limitations.
Examples include:
- Boots are visible on concrete floors
- Hardwood floor under soft lighting
- The camera is placed 3 meters away from the subject
- The subject is framed between two walls
These elements serve as spatial guardrails. Floors, distances and contact points stop floating characters, warped perspectives and scale inconsistencies. They also increase realism, especially in scenes with stylised elements.
Physical anchors let Grok imagine how bodies connect to space. This dramatically enhances the visual clarity.
Step 4: Stack Details Cleanly or Expect Chaos
The most frequently made errors in prompting are to dump details into an unstructured block. When two instructions are competing with each other, the model is able to improvise. The solution is to stack them cleanly.
A solid structure looks as follows:
- Shot type
- Art style
- Environment
- Subject or characters
- The mood and lighting
- High-quality textures and details
This hierarchy reflects the way visual scenes are built in film and photography. Each layer builds on the preceding one. If the layers are organised, Grok Imagine doesn’t need to figure out what is most important.
Rule of thumb: If two directions conflict, the model has to choose the most arbitrary one. Clean structures eliminate that risk.
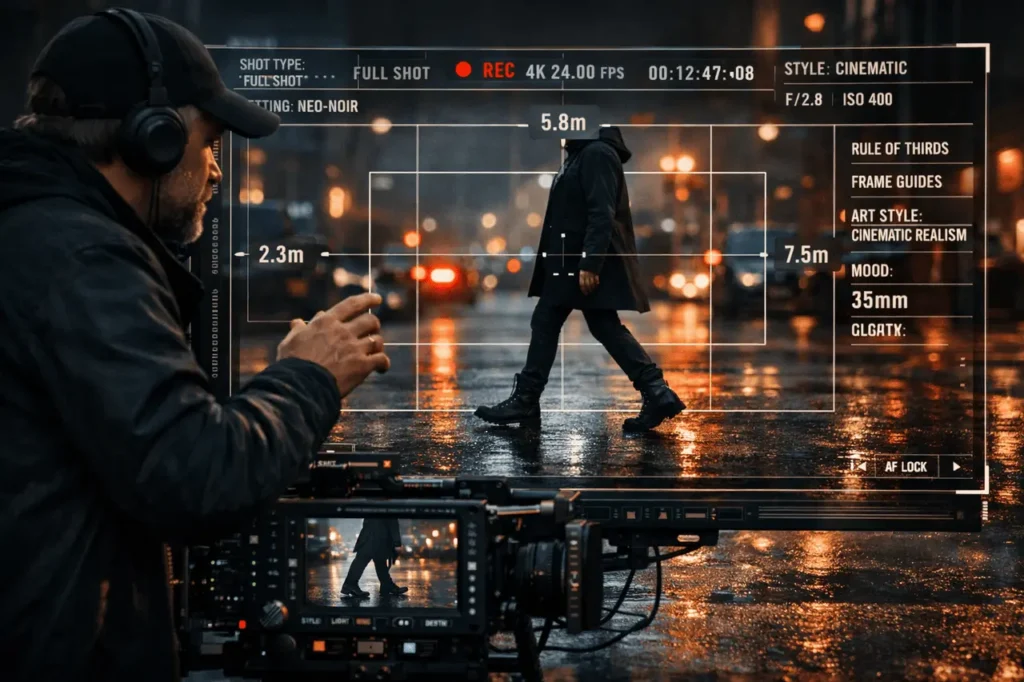
Step 5: Treat Grok Imagine Like a Camera, Not a Tourist
A tourist makes a point with a camera, hoping for something fascinating. A director defines intention and manages the variables. The same principle applies here.
Prompts that sound like a Tourist, similar to:
- “A cool filmic scene featuring a walking person”
Director-style prompts resembling:
- “Medium-wide shot Cinematic realism, dusk lighting, the subject walks away from the camera onto wet asphalt, a shallow depth of field, subtle colour scheme”
The difference isn’t in the verbosity; it’s the authority. The word “direction” replaces ambiguity by intention.
Grok Imagine: Common Mistakes to Avoid
Even the most experienced users can get caught in the following traps
- Instructions for key elements are hidden midway through the prompt
- overloaded adjectives that are not structurally ordered
- Skipping physical grounding, causing floating subjects
- Letting style remain implicit instead of explicit
Making sure to avoid these errors can significantly improve output quality without having to change the tools or settings.
Grok Imagine: Practical Example: From Average to Pro-Level
Average prompt:
“A futuristic person walking through an urban area at night, cinematic”
Directed prompt:
“Wide shot Cinematic Realism, bright modern city in the night, the subject is leaving the camera, boots dripping on the wet asphalt, camera set at street level and moody blue lighting, subtle reflections controlled, no background noise”
The second version doesn’t have the magic, but instead adds direction. Grok Imagine responds accordingly.
Final Thoughts
High-quality AI visuals aren’t accidental. They are controlled. Grok Imagine is best when it is treated as an actual camera set, not a mind reader. The type of camera determines perspective. The art style ensures consistency. Physical anchors frame the set, and neat detail stacking keeps the scene from becoming chaotic.
You can either direct the shooting or accept what the model decides to do. If you take the right approach, Grok Imagine can produce images that look intentionally professional, cinematic and elegant each time.
Frequently Asked Questions
1. The most significant aspect of controlling Grok Imagine?
The type of shot is the most critical aspect. It determines perspective and composition prior to any other details being applied.
2. Should art style be prioritised before or after the details of a character?
Art style must be the priority before the descriptions of characters. It determines how elements are interpreted visually.
3. Why are my images feeling unnatural, even with lengthy prompts?
Inconsistency typically results from non-structured prompts. The clean stacking of details stops the model from inventing conflicts between elements.
4. Do physical aspects like floors and distance really have any significance?
Yes. Physical anchors are used to stabilise the scene, increase the quality of the scene, and lessen visual distortion and floating subjects.
5. Is being more descriptive always better?
No. Clarity of hierarchy is more important than length. Direction beats verbosity.
6. Can these principles be applied to AI video generation, too?
Absolutely. The control of the camera, framing style and spatial grounding are crucial to ensure that AI-generated videos are consistent.
Also Read –